
How to Apply Press On Nails at Home?
Confused about how to apply press on nails at home? Don’t worry, we got you. For those of you who desire pretty, polished nails without spending too much time, money, or hassles of booking a last-minute appointment with your nail tech, press on nails have emerged as a popular beauty shortcut. You’ve come to the right place if you’ve ever wondered how to apply press on nails so they look natural and last for days. Even if you’re a total novice, you can get a perfect manicure at home with the correct setup, supplies, and method.
Choosing between glue and adhesive tabs, how to make press on nails last longer, and how to remove them safely and damage-free are all covered in this step-by-step tutorial.
Why Press On Nails Are So Popular?
Before learning how to apply press on nails, you need to understand why they are becoming so popular nowadays. I personally believe that Press ons are quick, easy to apply, affordable, and available in a vast array of patterns, colors, and, of course, shapes. I must say, they are ideal for events, travel, and daily wear too, because you can switch styles in a matter of minutes.
And you know what? They’re also good for beginners. Applying press on nails correctly makes the process easy and repeatable. Once you get done, you might get addicted to it
Things You'll Need Before You Begin
The key to a manicure that lasts is preparation. Before starting the application of press-ons, please gather the following essentials:
- Correctly sized Press-on Nails
- Glue tabs or nail glue
- Buffer and nail file
- Wooden Cuticle Pusher
- Alcohol Swabs
- A pair of Small scissors or clippers (optional)
In order to apply press-on nails safely and successfully, a dry workspace and clean tools are a must.
Safety tip:
Avoid the application of press-ons on nails that are over-damaged, irritated, or infected; otherwise, it might have serious consequences.
How to Apply Press On Nails: Step-by-Step Guide
For the best results as beginners, adhere to these simple steps of application.
Step 1: Clean and Prep Your Natural Nails
Preparations make a big difference in how to apply press on nails successfully.
- Please wash your hands with soap and water.
- Gently push back cuticles with the help of a tool, but avoid using force or making a sharp cut.
- To get rid of the shine, lightly buff the nail’s surface.
- To get rid of dust and oil, use alcohol wipes
- When applying press-on nails, dry, oil-free nails provide superior adhesion.
Step 2: Select the Size that fits your nail bed the best
Align each tip of the press-ons with your natural nail.
- Sidewalls should be covered by the press on without pressing into the skin.
- To serve a larger purpose, you can file the edges a bit when they are different.
Step 3: Choose Between Liquid Glue vs Glue Tabs
One common question we face in how to apply press on nails is whether to use liquid glue or glue tabs.
- Liquid Glue (Nail glue):
- Firm grip (normally 12 weeks to 2 weeks, when done properly)
- Glue Tabs (Adhesive Tabs):
- Gentle and suitable for beginners
- The removal process is quite easy.
- Absolutely perfect for short-term or casual wear
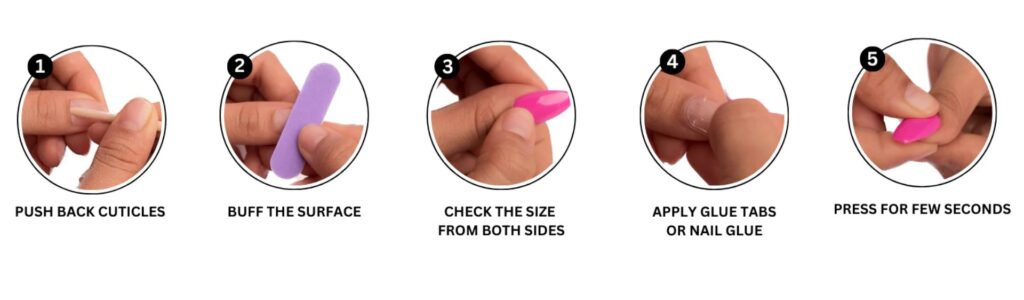
Step 4: How to Apply the Press On Nails
If liquid glue is being used:
- Apply a thin layer of liquid glue to your natural nail.
- Put a tiny drop on the press-on nail.
- Press down at a 45° angle while aligning with your cuticle.
- For 20–30 seconds, hold firmly.
If glue tabs are being used:
- Select the correct size of the tab by aligning it with your natural nail.
- Stick the tab to your natural nail and press flat.
- Remove the protective covering from the glue tab.
- Align and press the press on nail firmly for 15–20 seconds.
Repeat the same steps for each nail to finish applying press on nails neatly.
Step 5: Shape and Finish
Once all of the nails have been applied:
- If you find it necessary, file the edges.
- Avoid putting your hands in water for at least one hour.
- Apply cuticle oil around the nail.
These final touches enhance the look of the press on nails.
Tips to Extend the Life of Press On Nails
- The biggest enemy of adhesion is oil, so prepare well.
- To prevent air bubbles, you should use tiny amounts of glue.
- While applying the artificial nail, press it firmly and evenly.
- Put on the gloves when washing dishes.
- Do not pick or pry at edges.
With proper care and application, press on nails can last for over a week.
Safe and Damage-Free Removal
Damage-free removal is just as crucial as application. Press ons should never be torn off because this weakens natural nails.
For Glue tabs:
- Soak your hands in warm, soapy water for at least 15-20 minutes. Please don’t rush.
- Use the wooden stick to gently lift the edges.
For nail glue:
- Soak your nails in warm water, that is diluted with either oil or mild soap.
- Wait until the glue softens, and then carefully remove the nail with the help of a pusher ( a tool)
- Use a buffer to remove residue, but remember, don’t use force.
After removing press on nails, finish with hand cream or cuticle oil to replenish moisture.
Final Thoughts
Therefore, the overall conclusion is that learning how to apply press on nails at home is an easy method to have beautiful nails. Press ons can make you feel comfortable, look natural, and last for days if they are prepared properly, sized appropriately, and removed gently.
This is the perfect time to give them a try if you have not done it. Follow this tutorial on how to apply press on nails and experiment with different styles to find the one that best fits you.